


Overview
Document files such as PDFs must be uploaded to the Sitecore Media Library before they can be linked on a page or used in a component. You can upload documents directly from the Media Library, from the Rich Text Editor, or from inside a component.
This article covers:
- Upload a document from the Media Library
- Upload a file while editing a component
- Upload multiple files at once using a ZIP file
Before you begin
Make sure your document is ready for upload.
- Confirm you are uploading to the correct Media Library folder.
- Use a concise and unique file name. A reusable name makes it easy to replace the document later without changing the file name.
- Avoid special characters that Sitecore does not support.
- Confirm the document is accessible by reviewing the accessibility requirements in the document formats remediation guide.
Method 1: Upload a document from the Media Library
Use this method when you want to upload documents directly into a Media Library folder. Most authors start from the landing dashboard so their document is already uploaded and ready to place in a component or on their page.
- Open the Media Library.

Open the Media Library from the landing page, or if you are already in the Content Editor, open it from the bottom left, or the drop down in the upper right.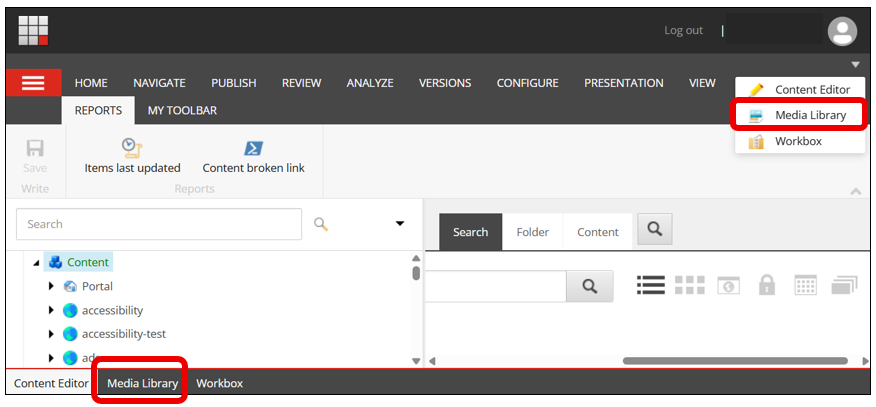
- Navigate to the correct folder
Browse the Media Library tree and select the folder where you want to store the document.
- Upload the document
Select Upload File.
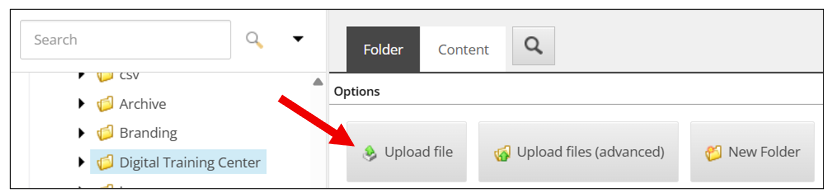
In the upload file window:
• Select Choose File
• Browse and select your document (you can upload one document at a time with this option)
• Select Upload.

- Select the Save
 icon located at the top left of the screen and Publish.
Method 2: Upload a file while editing a component
Use this path when you are already editing a component and need to upload a document immediately.
- Open the media link field
In the component, select Insert media link.
Note: if you're adding from within the Rich Text Editor, select Insert Sitecore Link . The Insert Link window will open; select the Media Items tab. Important: Navigate to the folder you would like to upload the document to.
 - Select the destination folder
Choose the folder where you want to upload the document.
After selecting the folder, click the Upload button (lower left). If you don’t see the Upload button, drag the edge of the dialog box to make it larger. Some screens display the window too small by default.
- Upload the document
After you click the Upload button, select Choose File, and select the file from your computer. Then, click the blue Upload button. - Optional: Add details if necessary (otherwise you can close that window).
Click Lock and Edit. Udate the Content Title if needed. - Click Save/Close.
- Enter a Link description for your component. Finally, click Insert.
 Finish editing the component.
 - Publish the component. NOTE: Since you did not publish the media file you just inserted, make sure to check the box next to Publish related items so that the linked media file is published at the same time.
Upload batch files
Use this method when you need to upload many documents at once. Batch uploads should be done directly in the Media Library from the landing dashboard.
- Navigate to the correct folder
Select the folder or subfolder where you want the documents to be stored.
- Upload the ZIP file
Select Upload files (advanced).

- From the Batch Upload dialog box:

- Select Choose File.
- Browse and select the document(s) on your computer.
- Name your files concisely and follow your agency’s naming conventions. The file name becomes part of the final URL, so keep it clean and descriptive. Avoid spaces, special characters and long file names.
- You can upload more than one document at a time.
- Check the appropriate boxes:
- Unpack ZIP archives: Select this option to upload and extract a ZIP archive to the Media Library. In the .zip file, you can include subfolders with files. The folder structure is re-created in the Media Library after the files are extracted. This upload may take some time, depending on the file size.
Once successfully uploaded, the folders and files will display in the content area. - Make uploaded media items versionable - Provides the ability to save versions of your images. NOT USED.
- Overwrite existing media items - This option allows you to upload a file with the same name as an existing file in the Media Library to replace the old file. If you don't select this option, a duplicate file will be created instead of replacing the original.
- Upload as files - Keep this option unchecked.
- Unpack ZIP archives: Select this option to upload and extract a ZIP archive to the Media Library. In the .zip file, you can include subfolders with files. The folder structure is re-created in the Media Library after the files are extracted. This upload may take some time, depending on the file size.
- Select the Upload button.
-
Select the Save Changes
icon located at the top left of the screen.
- Publish the Media Library file for the change to take effect.
Copy a document URL
You can copy the final URL of a document directly from the website.
- Locate the document link on the website page.
- Right-click on the link (you can also do this for images on a page too).
- Select Copy Link Address (or Copy image address).
- Paste the link where needed.
-
The final URL will look something like this - "http://portal.ct.gov/media/AgencyFolder/DocumentName.pdf"

-


