


There are two types of alerts you can add to your agency site:
- Agency alert: displays at the very top of every page on your site in a bright yellow banner.
- Banner alert: displays within the page body as a component in a light yellow box. It appears only on the specific page where you add it.
Agency alert (site-wide header alert)
The agency alert appears at the top of every page on your agency’s site. It does not display on any other agency sites.

NOTE: This alert is activated only for your specific agency site and will not appear on any other agency sites. It only shows on your agency pages.
How to edit the agency alert:
- In Sitcore, open Content Editor.
- In the content tree, go to:
Content → [Your Agency Site] → Content modules → Site Header Folder → Site Header
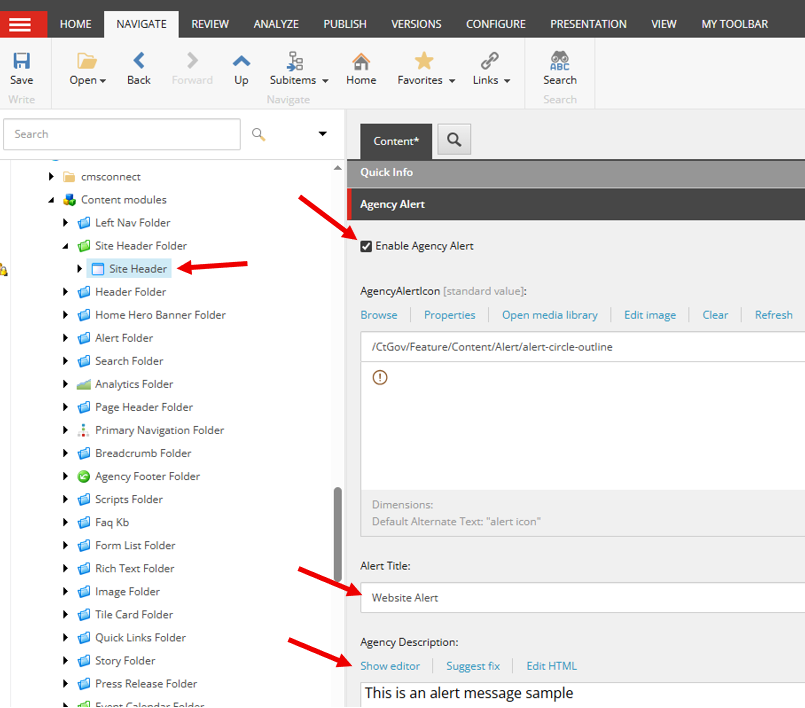
- Select the Agency Alert section.
- Update the fields:
- Enable Agency Alert: Check this box to display the alert.
- Agency Alert Icon: Choose an icon and browse to its location in the Media Library.
- Alert Title: Enter the alert title.
- Agency Description: Select 'Show editor' to add the alert message and any hyperlinks in the Rich Text Editor (RTE).
- Click Save.
- Publish the changes:
- First, Publish to Preview to confirm the text, link, and icon.
- Once everything looks correct, Publish to the live site.
Visit the site to confirm that the alert displays correctly.
Banner alert (page‑specific alert)
A banner alert appears in the main body of a single page. It does not display across the entire site.
How to set up a banner alert
- In Content Editor, right‑click the page’s _resource folder.
- Select Insert → Update Banner Folder and name it clearly (for example, Update Banner Folder).
- Right‑click the new folder and select Insert → Update Banner. Name the item (for example, Update Banner).
- Update the fields:
- Title — enter the alert title.
- Description — select Show editor to add the alert message and any hyperlinks in the Rich Text Editor (RTE).
- Icon — choose an alert icon and browse to its location in the Media Library.
Click Save.
5. Publish the changes:
- First, Publish to Preview to confirm the text, link, and icon.
- Once everything looks correct, Publish to the live site.


