
Edit an Agency-Specific Information Page
Edit Content
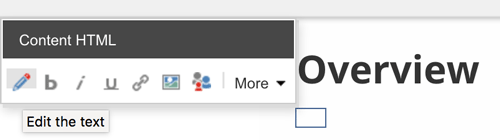
- Select the text that reads [No text in field] to activate a toolbox.
- The toolbox displays a list of some simple editing functions you can do right on the page in addition to entering in some text:
- Launch the Rich Text Editor
 .
. - Stylize text. (bold, italicize, and underline)
- Insert a hyperlink to another page within the website.
- Insert an image.
- Launch the Rich Text Editor
- The toolbox displays a list of some simple editing functions you can do right on the page in addition to entering in some text:
- For more editing functions, launch the Rich Text Editor by selecting the Edit the text icon.
- Enter your content into the Rich Text Editor.
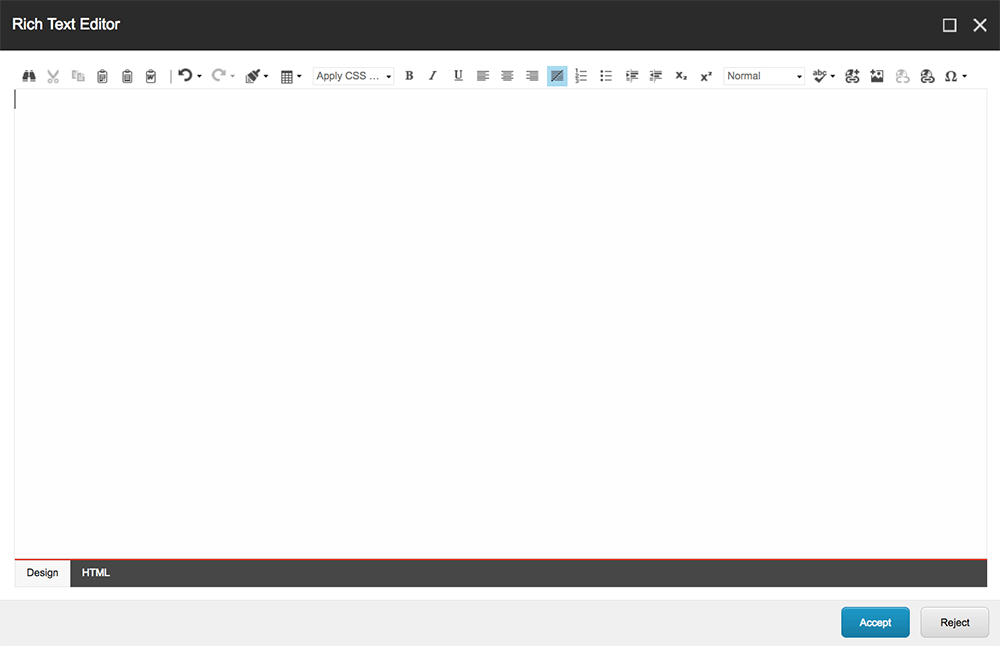
Learn more about the Rich Text Editor features
Add an image | Add a hyperlink | Add an email link | Add an anchor link | Add a table | Add an iFrame
Read Writing for the Web Guidelines
Ensure any images or tables you add meet accessibility compliance - Select the Accept button when you are done entering content to display your additions.
- Select the Save
 icon located at the top left of the screen. Save your changes often to keep from losing them!
NOTE: Select the Lock ![]() icon to check in your page if you are done editing.
icon to check in your page if you are done editing.
Edit Page Properties
Add and edit additional information like teasers and metadata to the task/page you just created to help others better understand the content of the page.
Add/Edit Teaser
A teaser is a brief description of the task/page that appears under the title in the topic listing it was tagged to. View the secondary page template for an example. To add a teaser, follow the steps below.
- Select the Add/Edit Teaser link in the grey page properties bar.

- A toolbar will appear with icons. Select the field editor icon
 .
. - A menu bar will appear displaying a field to enter the Teaser. Enter a brief description of the page. Use keywords in the description that visitors may search to find this task/page. Try to keep description high level and less than two sentences, about 275 characters.
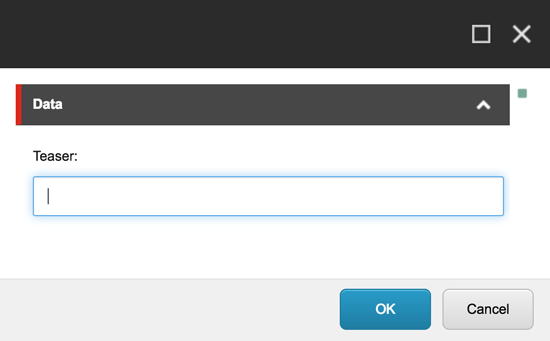
- Select OK.
- Select the Save icon located at the top left of the screen.
NOTE: Select the Lock ![]() icon to check in your page if you are done editing.
icon to check in your page if you are done editing.
Add/Edit Meta Data
This helps search engines understand the content of your page (in addition to the content ON your page).
- Select the Add/Edit Meta Data link in the page properties bar.

- A toolbox will appear with an icon called the field icon. Select the field icon.
- A toolbox will appear with an icon called the field icon. Select the field
- A dialogue box will appear displaying fields to enter in Metadata.
- MetaDescription - A brief description of the task/page that displays in search results.
- MetaKeywords - A short list of keywords or phrases, separated by commas, that help guide search engines to the content more accurately.
- MetaTitle - The title that displays in the browser or browser tab header and search results.
- Ensure the MetaTitle field displays the page title as shown on your page. The meta description and keywords are optional.
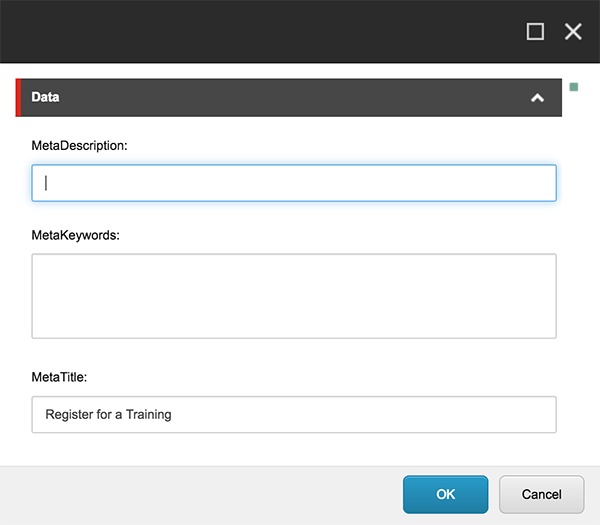
- Select OK.
- Select the Save icon located at the top left of the screen.
NOTE: Select the Lock ![]() icon to check in your page if you are done editing.
icon to check in your page if you are done editing.
Create a Sub-page
Create one or more sub-pages under the Agency-Specific Information - Local Navigation Template page. You can add multiple pages with specific content and those page titles will appear as the navigation to the Agency-Specific Local Navigation template page.
- Navigate to the page you just created using the Navigation Bar.
- Select the Go button.
- Select the Edit icon (if you are in Preview mode).
- Select the Insert Page
 icon.
icon. - Select the Sub Page option from the dialogue box.

- Enter a name for the page in the Name field. (Special characters are NOT allowed.)
- The page will open in Edit mode, already Checked Out and locked.