
Creating a New Page
Creating or inserting a new page is easy to do. Just follow these simple steps.
NOTE: If you are a Lift-and Shift Agency, visit Creating a page using the DSF Legacy Template.
- Log in to Sitecore.
Once logged in, you will be directed to your Agency website landing page in Preview Mode.
- Using the Navigation Bar, navigate to the folder you wish to insert a page
under. Select the carrot > symbol after your Agency name to view a drop down of the folders available. Keep drilling down until you come across the folder you wish to insert a new page under.

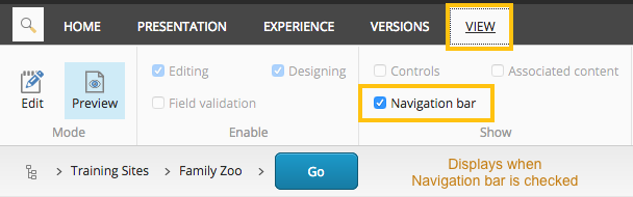
NOTE: If the Navigation Bar is not displaying, activate it by selecting the View tab from the Ribbon and selecting the Navigation bar checkbox. Once selected, it will always show when you log into Sitecore.
- Once you are at the folder you wish to insert a new page under, select the Insert Page
 icon from the Ribbon.

- A dialogue box appears with a variety of page template options to choose from. Select the template you wish to insert.
- The templates listed will vary depending upon your Agency and permissions.

- The templates listed will vary depending upon your Agency and permissions.
- Enter the page title in the Name field.
- Special characters are not allowed: [.,{}=-+\|!@#$%^&*()]
- This is the title Sitecore uses for the page name in the back end and displays within the URL.
- Select OK.
- Your newly created page will display and is now ready for editing, meaning it is Checked out and Locked. To complete the page creation process, continue on with the page components below:
- Select your Navigation Sections (for task pages ONLY)
- Add your Content
- Tag the Page (EXCLUDES Lift and Shift Agencies)
- Enter Page Properties