
Bat Houses
Bat Houses
Installing a bat house on your property can be a great way to help bats. Bat houses offer bats a safe and comfortable space to roost, and are useful resources in situations where bat colonies are being evicted from buildings. Larger bat houses can support entire maternity colonies and provide space for raising pups. For people, an occupied bat house presents an opportunity to observe bats and learn about their behavior. In Connecticut, bat houses are most likely to be occupied by Big Brown Bats, and secondarily by Little Brown Bats. These two bat species are insect-eaters, and their presence in your yard will contribute to the control of night-flying insects, like moths and mosquitoes.
A wide variety of bat houses are available for purchase from various retailers. You can also build your own bat house using the plans provided here. Whether purchasing or building a bat house, its usefulness to bats will depend heavily on both the characteristics of the house itself and where you decide to put it.
In addition to the tips that follow, keep in mind that installing a bat house before April improves the chance of occupancy that same year. Do not be discouraged if bats do not immediately start using a new bat house. It is not unusual for a house to stand empty for at least a year before it is used. Further, bats use bat houses for various reasons, including stop-overs during seasonal migrations and nightly roosting bouts.
Selecting a Location
Before buying or building a bat house, you should have a suitable location in mind. The following criteria should be considered before installing a bat house:
- Bat houses placed near water or wetland areas often are most successful, but a bat house can be valuable anywhere that bats forage.
- Bat houses attached to the sides of buildings have the greatest reported success, as the buildings help regulate temperatures in the bat house. Free-standing poles in open areas also work. However, trees are not recommended as they are typically shaded and make bats vulnerable to predators that perch in or climb trees.
- South and southeast exposures are best for maximizing warmth retained from the sun. Bats prefer houses that are quite warm and get at least 6 hours of sunlight a day.
- Bat houses should be installed so that the bottom of the house is at least 12 to 20 feet from the ground. Bats drop down into flight when leaving a bat house, and space is needed for that.
- If possible, the area within 20 feet in front of the house should be unobstructed by tree branches or other objects. This provides a clear flight path.
- If feasible, provide bats with multiple bat houses strategically placed on a property so that a range of temperature options are available. Bats will seek cooler areas on very hot days, while warmer houses are generally preferred by female bats with young. This will enhance the health and viability of a bat colony, particularly as weather has become more unstable in Connecticut.
Optimal Characteristics
Bat houses should have certain characteristics to provide an optimal environment. These characteristics should be kept in mind whether you are purchasing a bat house or building your own. The following tips apply for bats and bat houses in the Northeastern United States, including Connecticut:
- Bat houses should be painted or stained a dark color (black or brown) to maximize solar heating. Oil-based stains and paints should not be used. Shingles are recommended for roofs of larger bat houses.
- The ideal spacing for internal chambers is 3/4 of an inch (ideal for both Little Brown and Big Brown Bats) and should not exceed 1 inch.
- Larger bat houses (20 or more inches tall) with multiple chambers tend to have a better chance of being occupied by bats because they provide a greater range of temperatures inside the house.
- Interior surfaces should be either horizontally grooved at intervals of 1/4 to 3/4 of an inch, or they should be rough enough for bats to cling to. Surfaces may be grooved with a saw or sharp tool or roughened using an abrasive material, such as steel wool. Attached screening is not recommended as it can be an entanglement hazard for bats.
- All outer seams should be snug and caulked (use an exterior grade caulk/sealant) to keep out rain water and retain heat. This will keep the inside warm and cozy for bats.
- There should be a roughened landing area that extends 4 or more inches below the bottom of the bat house.
- The bat house should be held together with exterior grade screws. Screws are preferable to nails.
- Bat pups occasionally fall out of the roost before they are able to fly. For bat houses that may serve as maternity colonies, consider installing a "pup-catcher" approximately 3 to 5 feet below the opening. Such structures can be a simple screened platform onto which a pup can land until the female bat can retrieve it.
Constructing a Bat House
Bat house designs range from simple and small-scale to large and complex. Two simple designs are provided here. The small bat house has a single roosting chamber and accommodates fewer bats, but is easier to build. The large bat house provides more roosting options and is ideal for larger nursery colonies of females and young.
In the interest of supporting sustainable use of Connecticut's forests and reducing carbon emissions associated with shipping lumber from out of state, you may want to consider purchasing Connecticut Grown Forest Products for your project. In addition to lumber or plywood, you will also need exterior grade screws, caulk/sealant, black or brown exterior stain or paint, and basic woodworking tools.
Small Bat House Plans
Use rough-cut lumber or exterior grade plywood ½-inch thick minimum). The spacers (E) should have a finished thickness of approximately ¾ inch. Dimensions and screw lengths may vary depending on what size lumber, plywood, or tools are available to you.
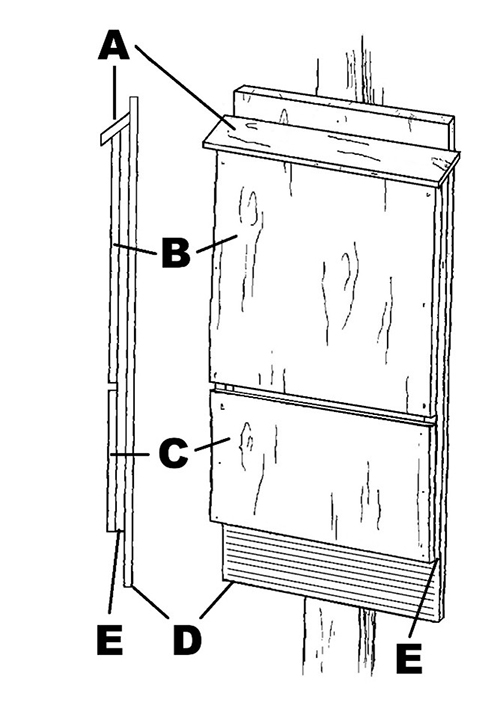
A – Roof, 3 ½ inches by 14 inches
B – Upper front, 12 inches by 20 inches
C – Lower front, 12 inches by 10 inches
D – Back, 12 inches by 36 inches
E – Spacers ¾ by 1 by 30 ½ inches
- Prepare interior surfaces. As described above, groove or roughen the insides of the back (D) and insides of the front pieces (B and C). For all surfaces, leave 1-inch unscratched margins along the sides.
- Attach spacers to upper front. Attach both spacers (E) to the upper front (B) so that the space between the front and back of the house will be ¾ inches. Spacers should run flush along the 20-inch edges of the upper front and be flush at the top. Use caulking and 1-inch screws. Do not put screws within 1 inch of the top of the bat house; this portion will be cut to create a bevel.
- Bevel top of house. Saw through the top of the bat house at an angle of 20 degrees to create a slope for the roof.
- Attach back. Position the spacers and front 1 ½ inches below the back of the bat house (D). Apply caulk between the spacers and the back of the bat house. Use 1 to 1 ½ inch screws to secure the back of the bat house (D) to the backs of the spacers, avoiding screws installed in previous steps.
- Attach lower front. Leaving a ½ inch gap between the upper and lower fronts, use 1 to 1 ½ inch screws to attach the lower front (C) to the bottom of the spacers (E).
- Bevel roof. Put a bevel of 20 degrees on the back of the roof (A) so that it will fit flush with the top and back of the bat house.
- Attach roof. After laying a bead of caulk around the top of the bat house and where the roof will contact the back, attach the roof (A) using at least 2 screws drilled through both sides of the top of the roof and into the spacers (E).
Large Bat House Plans
Use ½ inch exterior grade lumber or plywood for front and back sections, and ¼ inch for all partitions. Cut sides and roof from 1-inch-thick boards. If you would like to build a smaller bat house, you may adapt these plans by reducing the width down to 14 inches or decreasing the number of internal chambers.
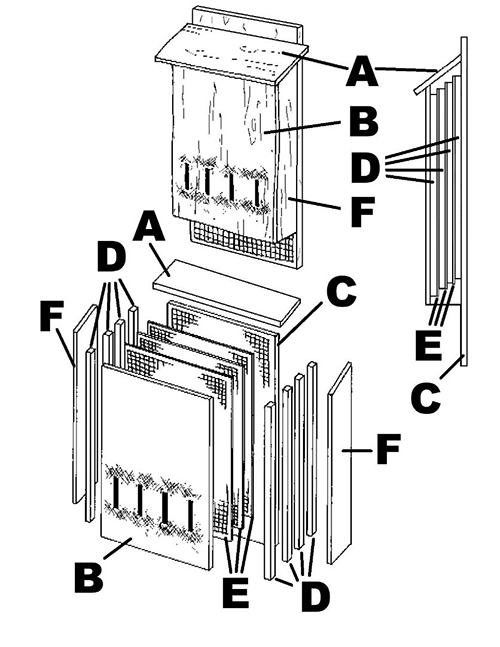
A – Roof: 6 by 28 inches (1 inch thick)
B – Front: 24 by 28 inches (cut 4 slots, approximately 3/8 inch wide by 6 inches high for vents, evenly spaced, beginning 4 inches from bottom)
C – Back: 24 by 36 ½ inches (½ inch thick)
D – Spacers: a total of eight that are ¾ by 1 by 27.5 inches
E – Partitions: 22 by 27 ½ inches (cut from ¼ inch thick plywood, 3 total)
F -- Sides, with tops cut at an angle: 3 ¾ inches wide by 27 ½ inches (shorter edge) and 29 inches (longer edge)
- Prepare interior surfaces. As described in the "Optimal Characteristics" section, groove or roughen the insides of the back (C), the inside of the front (B), and both sides of each partition (E). This makes it easier for bats to cling to these surfaces. Leave 1-inch margins along the sides and a 3-inch margin along the top of the back (E).
- Attach sides to back. Attach the sides (F) to the back of the bat house (C), leaving 3 inches of space at the top and 4 1/2 inches at the bottom for the landing area. Use at least three 1 ½ inch screws in each side, evenly spaced.
- Install first partition. Lay 2 spacers (D) along the inner edge of each side of the bat house, 1 ½ inches down from the top of the back (C), such that the space between the back (C) and first partition (E) will be ¾ of an inch. Lay a bead of wood glue beneath the spacers, then replace them and lay a partition (E) directly on top of them, flush with the tops and bottoms of the spacers. Use 1 ¼ inch screws, drilled through both the partition and spacers, to secure these pieces to the back (E). Three screws on each side, evenly spaced, are sufficient.
- Install second partition. Lay a second set of spacers (D) along the inner edge of each side of the bat house, ½ inch down from the top of the last partition (C). Lay a second partition on top of these spacers, flush with their tops and bottoms. Secure with screws as before.
- Install third partition. Lay a third set of spacers (D) along the inner edge of each side of the bat house, ½ inch down from the top of the last partition board (C). Lay a third partition on top of these spacers, flush with their tops and bottoms. Secure with screws as before.
- Secure partitions using final set of spacers. Lay a fourth set of spacers (D) along the inner edge of each side of the bat house, flush with the top of the last partition board (C). Secure with screws as before. For internal stability, put screws into these spacers by drilling through the sides of the bat box; use 1 ½ inch screws.
- Bevel front. Put a bevel of approximately 21.8 degrees on the top edge of the front (B) so that it will align with the angled roof.
- Attach front. Secure the front of the bat house (B) to the sides (F) using at least six 1 ½ inch screws (3 along each side). Be sure that the top edge is flush with the angled tops of the sides.
- Bevel roof. Put a bevel on the back edge of the roof so that the length of the top remains 6 inches, but the underside depth is reduced by 0.4 inches. (This is a 21.8 degree angle.)
- Attach roof. After laying a bead of caulk along the top, secure the roof to the top of the bat house using four 1 ½ inch screws. Be sure it is centered and flush with the back of the box.
Content last updated in September 2025.